|
|
|
|
|
|
|
|
|
|
|
|
|
||
|
|
|
|
|
|
|
|
|
|
|||||
|
|
|
||||||||||||
|
|
|
|
|
|
|
||||||||
|
|
|
|
|
|
|
|
|
|
|
|
|
||
|
|
|
|
|
|
|
|
|
|
|||||
|
|
|
||||||||||||
|
|
|
|
|
|
|
||||||||
| CorelDRAW Verses CAD Round 2 - page 8 |
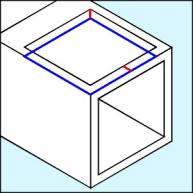 |
That little red line is also our guide for the thickness of the cutout. Apply a 120-degree rotation to a duplicate of the red line with the Transform Roll-up. Pick the line up and snap it to the top corner. Duplicate the cutout and snap it to the bottom of the line. (Shown with a blue outline for clarity.) Choose no fill so you can see what is going on next. |
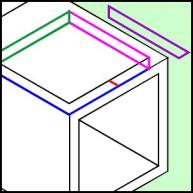 |
The magenta outlined object shows the results from "connecting the dots" to create the inside "Front" of the cutout. The purple outlined object shows what happens when pick the top cutout square and choose the Intersect command and pick Leave Original, Other Objects and click on the "connecting the dots" object. Go ahead, "connect the dots" and Intersect. After performing the intersection apply a horizontal mirror to a dupe of the new shape and snap it into place on the other side (shown with a green outline). The lower cutout square can now be deleted. Leave the little red line! |
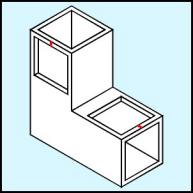 |
Add a node with the plus sign on the Node Edit Roll up to the top outside square. Pick up the top cutout objects and apply a 120-degree rotation to a duplicate of these objects. Move them off to the side and then pick them up near the top of the little red line and snap them into place and bring them to the front (Shift+Page-Up). Note: In the illustration I have put all the lines back to black except for the little red line. |
Home,
About, Contact,
FAQ, Shop,
Products, Services,
Learn, Tips
and Tricks, Tools
© 1997 - 2001 John M. Morris

