|
|
|
|
|
|
|
|
|
|
|
|
|
||
|
|
|
|
|||||||||||
|
|
|
||||||||||||
|
|
|||||||||||||
| Using CAD Data to produce isometrics - page 8 |
 |
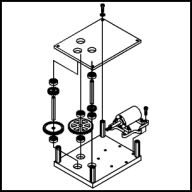
Go back to the top plate and group (Ctrl+G) all of it. Constrain (Ctrl) move down as shown. Duplicate the gear train 1 angled flow line and constrain (Ctrl) move it up below the top plate with the Pick Tool. Snap the 6 inch vertical line to the end point of the line just duped and moved. Select the duped line and with the Node Edit Tool (F10) constrain (Ctrl) drag the bottom node up to just below the top plate. |
 |
To add the top plate mounting hardware draw a vertical flow line from the center of the hole on the standoff located nearest the worm gear extending up above the top plate. Add the following from the Symbol Roll-Up with the stated settings: External Tooth Lock washer #47 0.35 inch, and Slot Head Screw #48 0.5 inch. Shift click select the screw, washer and finally the flow line and align (Ctrl+A) horizontally. Adjust the flow line height to just below the screw threads. |
 |
A partial view is shown. Use the Node Edit Tool (F10) constrain (Ctrl) extend the gear train 2 flow line above everything. Working up from just above the top plate up, use the Symbol Roll-Up to add the Retaining Shaft #49 1.0 inch. Move this symbol to the Side [blue] guide and using the Node Edit Tool (F10) and the constrain key (Ctrl) adjust the overall length and the spacing between the retaining ring slots accordingly. When done move the symbol back into position above the top plate. Use the Symbol Roll-Up to add the following with the stated sizes: Retaining Ring #50 0.3 inch, Bushing #51 0.6 inch, Bevel Gear #52 0.95 inch, Bushing #51 0.6 inch, and Retaining Ring #50 0.3 inch. Shift click select all of these symbols - ending with the flow line and align (Ctrl+A) horizontally. |
Home,
About, Contact,
FAQ, Shop,
Products, Services,
Learn, Tips
and Tricks, Tools
© 1997 - 2001 John M. Morris