|
|
|
|
|
|
|
|
|
|
|
|
|
||
|
|
|
|
|
|
|
|
|
|
|||||
|
|
|
||||||||||||
|
|
|
|
|
|
|
||||||||
|
|
|
|
|
|
|
|
|
|
|
|
|
||
|
|
|
|
|
|
|
|
|
|
|||||
|
|
|
||||||||||||
|
|
|
|
|
|
|
||||||||
| Creating the Controls - page 6 |
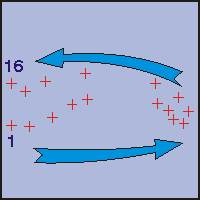 |
Plotting Object 6 It’s been a while since we had to explore the original reason for this tutorial series – Plotting objects in real space. The hand brake handles are a good reason to resume. Zoom in on the lower left corner of the page (x 0.00 y 0.00) so that you can see an area about 4 inches across. Create two 0.25-inch long intersecting lines and group them together. Duplicate and place (using the Property Bar) according to the table below:
|
|||||||||||||||||||||||||||||||||||||||||||||||||||||||||||||||
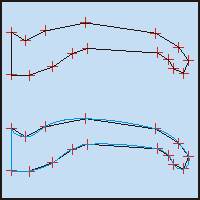 |
Creating Object 6 Starting at plot point 1 click over the crosses with the straight line pencil tool. Once the shape is closed, convert the segments to curves and smooth as shown in the second example (blue line). |
|||||||||||||||||||||||||||||||||||||||||||||||||||||||||||||||
 |
Transforming Object 6 Duplicate and apply a horizontal mirror to the handle. Since these objects are rotated down (more open) you need to apply a modification of the standard formulas. Apply the following: Vertical stretch 90 percent. Horizontal skew 34 degrees, Rotate 30 degrees and fill with white. |
Home,
About, Contact,
FAQ, Shop,
Products, Services,
Learn, Tips
and Tricks, Tools
© 1997 - 2001 John M. Morris

