|
|
|
|
|
|
|
|
|
|
|
|
|
||
|
|
|
|
|
|
|
|
|
|
|||||
|
|
|
||||||||||||
|
|
|
|
|
|
|
||||||||
|
|
|
|
|
|
|
|
|
|
|
|
|
||
|
|
|
|
|
|
|
|
|
|
|||||
|
|
|
||||||||||||
|
|
|
|
|
|
|
||||||||
| Drawing the computer unit - page 1 |
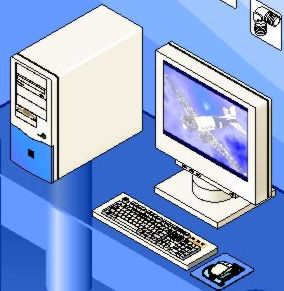 This
month’s lesson covers the completion of the demonstration computer in
our trade show booth. Rather than continue to work on the very large
scale the next step in the computer’s creation will take place on a 40
inch x 40-inch paper. This
month’s lesson covers the completion of the demonstration computer in
our trade show booth. Rather than continue to work on the very large
scale the next step in the computer’s creation will take place on a 40
inch x 40-inch paper. |
||||||||||||||||||||||||||||||||||||||||
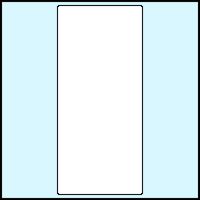 |
Step 01 Start a new drawing and set the Layout, Page Setup, Custom, 40 inch x 40-inch page size. Create a rectangle 7.75 inches wide by 17.0 inches high. Round the corners very slightly with a setting of 4. |
|||||||||||||||||||||||||||||||||||||||
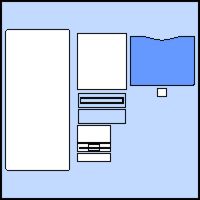 |
Step 02 Create the following rectangles:
|
|||||||||||||||||||||||||||||||||||||||
Purchase our Tech Drawing Tools and work more efficiently
Home,
About, Contact,
FAQ, Shop,
Products, Services,
Learn, Tips
and Tricks, Tools
© 1997 - 2002 John M. Morris

