 |
|
|
|
|
|
|
|
|
|
|
|
|
|

|

|
|

|

|

|

|

|
|
|
|
|
|

|

|

|

|

|
|
|
Creating
Isometric Nut Symbols -
page 6
|
 |
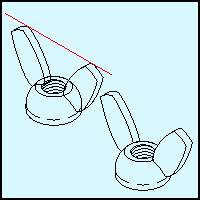
Step 16
- Use
the Transform Docker to apply the following to create isometric
front views of the wings. Horizontal stretch 86.6 percent, Vertical
stretch –30.00 degrees.
- Apply
a rotation of –120.00 degrees to both wings
- Dupe
the wings and move them up vertically 1.00 inches using the Property
Bar.
- Use
the node edit tool to break the nodes at the points shown. Break
apart and delete the upper lines. Use the straight line pencil tool
to close the objects.
- Use
the trim command to achieve the illustrated effect.
- Rotate
back 120.00 degrees (The completed version is shown with a white
fill for reference only.
|
 |
Step 17
Assemble the wings with the nut section from Step
14.
Use the Trim command on the Shaping Docker to
delete the unneeded parts. Combine (Ctrl+L) everything |
 |
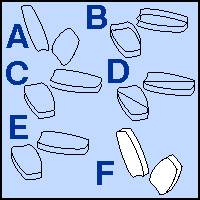
Step 18
Wing Nut – Bottom view
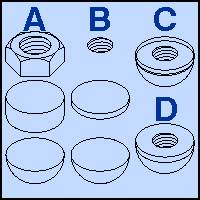
- Get
the components shown from your previously drawn objects. Resize
everything to 8.00 inches across and align all three objects
horizontally centered.
- Break
everything apart. Delete the objects shown from the nut and reduce
the remaining objects to 80 percent of the original size.
- Move
things around as shown in the top example snapping the bottom into
position. Drag the bottom nodes up with the Node Edit Tool.
- Trim
the dome with the bottom of the cylinder.
|
Home,
About, Contact,
FAQ, Shop,
Products, Services,
Learn, Tips
and Tricks, Tools
© 1997 - 2001
John M. Morris