|
|
|
|
|
|
|
|
|
|
|
|
|
||
|
|
|
|
|||||||||||
|
|
|
||||||||||||
|
|
|||||||||||||
| Welding in CorelDRAW - page 3 |
 |
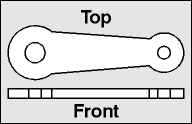
Engineering drawing of a link arm. |
 |
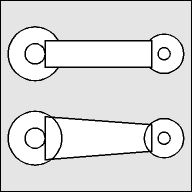
Draw two perfect circles (F7+Ctrl) to achieve a result
similar to what is shown on the left. Align (Ctrl+A) horizontal and
vertical and duplicate (Ctrl+D) and drag them to the right. Reduce them
to about 75 percent of the original size using the corner handles. Next
draw a rectangle (F6) whose length is inside the big circles and whose
height is about as shown. Convert the rectangle to curves (Ctrl+Q) and
select the Node Edit Tool (F10). Select the top left node and use the
keyboard arrow key to nudge it up [count nudges] to achieve the result
shown. Repeat for the bottom left node. Marquee select everything and
align (Ctrl+A) vertically. Select the two big circles and the modified rectangle with the Pick Tool and weld. Use the Node Edit Tool (F10) to select the outside object, marquee select all of the nodes and add nodes with the Node Edit Roll-Up (Ctrl+F10). Finish this step by applying a white fill. |
 |
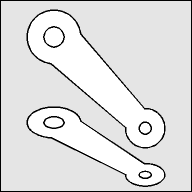
Marquee select everything with the Pick Tool and use the Transform Roll-Up to apply a -45 degree rotation. Follow this with a Vertical scale of 57.4 percent. Fill the result with white. |
Home,
About, Contact,
FAQ, Shop,
Products, Services,
Learn, Tips
and Tricks, Tools
© 1997 - 2001 John M. Morris