|
|
|
|
|
|
|
|
|
|
|
|
|
||
|
|
|
|
|
|
|
|
|
|
|||||
|
|
|
||||||||||||
|
|
|
|
|
|
|
||||||||
|
|
|
|
|
|
|
|
|
|
|
|
|
||
|
|
|
|
|
|
|
|
|
|
|||||
|
|
|
||||||||||||
|
|
|
|
|
|
|
||||||||
| CorelDRAW Verses CAD Round 2 - page 7 |
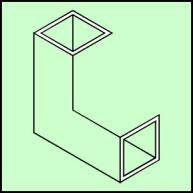 |
Marquee select the side and all the parts and use the Transform Roll-up to apply a 120-degree rotation to a duplicate of those objects. Pick them up at the lowest node and snap them to the top surface. |
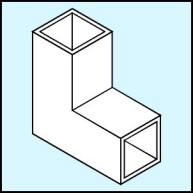 |
Duplicate the outside side square. With the Node Edit Tool (F10) marquee select the two bottom nodes and drag them to the inside corner. Duplicate this (a top face) and marquee select the right nodes and drag them to the top inside edge. Fill everything with white. |
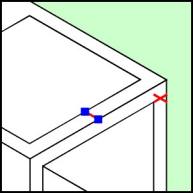 |
Now we will add the cutouts to both the top and front faces. Pick up the inside top square from its left corner and duplicate (Ctrl+D) it and move it as shown (just get it close). We need to position this correctly so lets create a measuring tool. This top face cutout is in from the edge the same distance as the wall thickness. Zoom in and draw a line from the (red line) inside corner to the outside wall. Apply a horizontal mirror to get the line going in the right direction. In turn pick a node on the side square and the top outside square and add a node (blue shapes) with the plus sign (this adds a node exactly centered) on the Node Edit Roll-up. Pick up the line and snap it to the new side node. Pick up the rotated square near the new node and snap it into place. |
Home,
About, Contact,
FAQ, Shop,
Products, Services,
Learn, Tips
and Tricks, Tools
© 1997 - 2001 John M. Morris

